
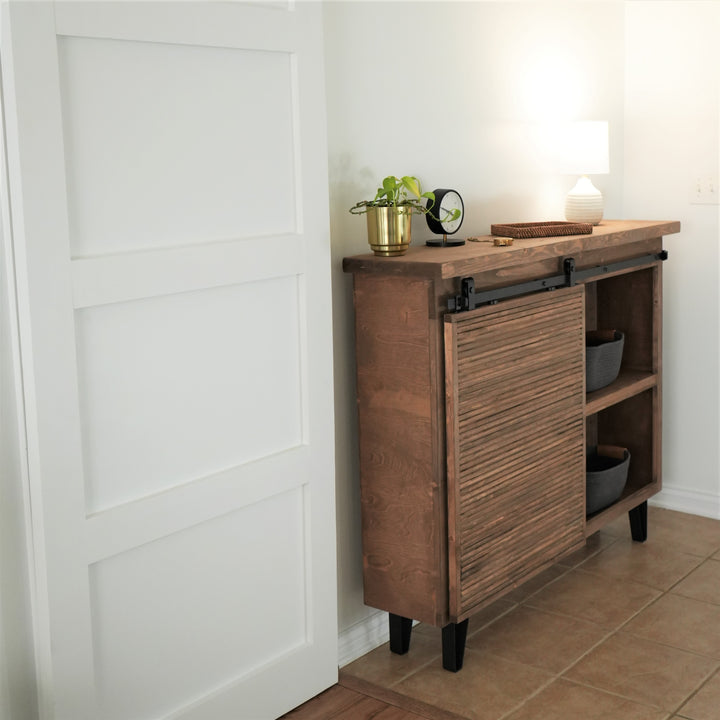
Entryway Console Table
A special thank you to National Hardware for sponsoring this blog. All opinions are my own. #nationalhardware
Having the proper storage in your entryway will help to keep all the unnecessary clutter at bay. The functional entryway console table will add style and a ton of storage to your space. It has a compact design and plenty of space for baskets/trays for organization. The functional barn door will allow you to hide items you do not want seen while giving your space the design you want. So let's gather our materials and let's make some saw dust!
Difficulty: Intermediate
1-2 People required
1-2 days needed
Tools/Supplies:
- National Hardware Sliding Door Hardware Top Mount Mini Kit (STOCK # N186-900)
- Saw / Circular Saw
- Drill
- Drill bit (3/16 inch)
- Measuring tape
- Wood clamps
- 1-¼ pocket screws
- Pocket plugs
- 2” wood screws
- Pocket screws
- wood glue
- stain or paint of your choosing.
- Sawhorse
- Socket and Socket Wrench
- 48” level
Step One:
Samantha and I debated on what design we wanted. We knew it had to be a slim design so it wouldn’t jet too far into the entryway. We wanted it to have a different feel than the barn door and add a modern touch. I really love sketching the project in CAD to make the entire process so much easier. With the National Hardware Sliding Door Hardware Top Mount Mini Kit, you get all the hardware necessary for installation. This kit even had all the hardware organized in their own boxes that matched the instructions. Really made it so easy to install. With all National Hardware kits, you know they are high quality and amazing instructions that make install super easy. Now let's gather all the material and let’s start building the frame for our outdoor table. This project can be customized to fit your look and style, so do not be afraid to change something.
Step Two:
It is time to start getting this cabinet put together. With this build I decided to use ¾” birch plywood. Using my sawhorses, I laid out and cut the following pieces using my circular saw. Keynote is to make sure you have a sharp blade; this will help eliminate tear out on your expensive piece of plywood.
(1) 48” x 34.5” Back
(2) 34.5” x 9.25” Sides
(3) 48” x 8-½” Top, Shelf, Bottom
We will assemble the cabinet using wood glue and pocket holes. Feel free to use any building method you would like. Take the back (48” wide x 34.5” tall) and add a min of 10 pockets holes on each 34.5” side. Make sure your pocket hole jig is set up for ¾” material. Take one of the side panels, align it with the back and install using wood glue and pocket screws. I feel it makes it easier to clamp before installing the pocket screws. Repeat the same process on the other side, assure everything is staying square. Add a min of three pocket holes on each end of the top and bottom pieces. Using wood glue and pocket screws install the top and bottom pieces. Measure where you would like your middle shelf installed. We decided to go with 14-⅝” from the bottom to keep everything looking centered after the barn door kit is installed. Using a stop block and clamps to help hold the shelf, use a level while installing to keep everything true. Install the middle shelf using pocket hole screws. I would use a min of three on each end. If you feel your shelf needs a mid-support add a piece in the middle using pocket screws.


Step Three
After letting the cabinet base dry now it was time to dress it up with a nice face frame. I started with the top horizontal piece; this will also be where the barn door track will be installed. Using the hardware I did a mockup to make sure I was allowing myself enough room, keeping in mind the top that is not installed. I installed a ¾”x4x49.5” top face frame piece to accommodate the barn door kit. I finished up face framing the remainder of the cabinet in ¾”x1.5” trim! I installed all with wood glue and 18ga 1-½ nails. Here I took time to fill in all the nail holes with putty and glued in pocket hole plugs. Once everything dried, I sanded everything down with 120 grit.
Step Four:
Now for the top I wanted it to be a little thicker. I went and glued up (3) 2x6 boards that were 52.5” long. The final width of the top will be 12” after being cut down. Hopefully you can find wider boards in your area to cut down on waste. I applied glue to all mating sides. Then I clamped up the boards and set aside to dry. This is a great time to start applying stain to the cabinet base and start to plan your barn door.
Once the top had dried, I took it out of the clamps and started sanding. I started with 80 grit and worked my way down to 220 for a nice smooth finish. Now I can apply stain to the bottom, allow it to dry and then apply to the top!

Step Five:
The barn door was going to be the center of this build. We really wanted this to carry a different look than the halltree and barndoor. When I was figuring the top face frame piece, this gave me the chance to figure the needed height of my barn door. I wanted it to cover half the cabinet (width way) so I went with the dimensions of 25.25” wide by 30.25” tall. The barn door is made out of a piece of ¾” birch 23.75” x 28.75” with ¾” thick by 1” deep trim all around. Now we can have some fun with the pattern. I wanted it to stand out and really have a modern feel. I picked up some half round trim and added those horizontally all the way up! I absolutely love how this turned out! You could also use a router and make a pattern yourself. This would cut the cost of this build down rather than having to purchase expensive trim. Remember you can make the barn door in any look you like and really make it yours. Then I sanded any needed areas and applied the same stain as the cabinet. Note: DO NOT INSTALL THE TOP YET!


Step Six:
You have a finished cabinet! I added these really cool modern feet after everything was dry! Now let's officially get this barn door kit installed. National Hardware does a really great job explaining each step and makes for a simple install. Go back to the notes you made by mocking up the track for figuring the barn door and top face frame piece. Using a level, place the track in the correct spot and mark the holes with a pencil. Using a 3/16” drill bit, drill each hole! Using part “B, N, & P” install the track making sure you have the hardware oriented correctly. Use a level the whole time to make sure everything is staying level. You want your door to ride true.


Take your completed door and turn it to where the top is facing up. Make sure the hanger straps are facing the front of the door. I measured 3” on each side to center the hangers, you can choose to do something different, just make sure they are the same on each side. Use a 3/16” drill bit to drill pilot holes for each hole. Then install the hangers on the door!

Step Seven:
Before hanging the doors on the track add the anti-jump disks. Center an anti-jump disc on the top edge of the door near a hanger. Make sure you spin the disc where the hole is closest to the front of the door. Repeat on the other side.

Rotate the anti-jump disc out of the way before installing the door on the track. Test to make sure the door slides smooth and is level. The last thing to do is install the door stops so your door doesn’t fly off. Slide your door to the closed position and install your first stop and tighten your set screws. Repeat on the other side! Once you are happy now install your top using 2” wood screws.


This is by far one of my favorite pieces of furniture that I have built! I absolutely love this barn door and the style it brings to our entryway. I always love to take a moment to stand back and enjoy what we just created. The Slide Barn Door Mini Kit adds so much character and function to this console build! The high quality and finish will stand the test of time! Another project made easier with National Hardware. Now we can add our final touches of decor to really make it feel like home! I want to thank National Hardware for sponsoring this project. They really make it easy to take an idea and turn it into something real.


I would love to know in the comments what you guys think of the build! It is my favorite barn door for sure. Thank you so much friends for taking the time to read, now let's go make some sawdust and create an amazing piece for your entryway! As always stay classy!
Everything Enchanting on
I love the slim and sleek design of this entryway console table and hope to add one to my space as well someday soon! Thanks for the detailed tutorial 🙂
Christy Garrett on
I love this entry way console. In my house, my entry way steps straight into the kitchen/living room.
Catalina on
It’s definitely a beautiful peace and that gives a special touch to the space. The door is absolutely gorgeous!
Melsisa Cushing on
I am showing this one to my husband. He colds furniture too and will absolutely love this design! How amazing… making your own furniture and the loom of it is so modern and fun!
Gervin Khan on
Awesome! This entryway console table looks really great and very mesmerizing! I love everything from the structure to the color, especially the sliding door that comes from it!
Renee on
That is so beautiful. I will need to have my husband make this for me.
Beautiful Touches on
Wow, that console table turned out beautifully. I really like the finish on the wood as well!
laura on
It’s a beautiful piece of furniture. I would love to have one.
Richelle Milar on
Wow! I’m gonna let my husband see this! This is a really nice craft to do I love it!
Monica on
This turned out so beautiful. I love how the color of the wood gives it a vintage look. I could never make something this good!
Tara Pittman on
This would be perfect for stashing items that I need to grab out the door. I could put my shoes in it.
Amber Myers on
This turned out so nice! I need one of these for sure.