

Fence Gate Build with National Hardware
A special thank you to National Hardware for sponsoring this blog. All opinions are my own. #nationalhardware
Ever since we have lived in our home, one of the projects I wanted to tackle was replacing our worn-out gate. It has to be at least 20 years old and clearly has seen better days. Our fenced in yard is so important to our two rescue pups Bandit and Bella, and it is a safe place for our kiddos to play. One of the most annoying things about our fence was the sagging gate. It was so hard to open, and it was coming apart. My friends over at National Hardware had all the tools to create a gate that will properly work for us again.
In the steps below, I will showcase how National Hardware makes building a fence gate easy and give peace of mind that it will stand the test of time. Let’s make some saw dust and get busy!

Difficulty: Intermediate
Tools Required:
Miter Saw and Circular Saw
Fence screws
Clamps
Tape Measure
Drill w/ proper drill bits
Safety Glasses
Hearing Protection
Gloves
Marker
National Hardware Parts List: Stock # n109-060
Step 1
The first step to any good build is planning. This usually will keep you on budget and make the whole process a lot easier. For our application, I had to replace the entire run of fence where the gate was going to be installed. You may or may not have to do this, but make sure the structure around your gate is sound. I made sure the opening is square and the post I replaced was as well. I will be screwing the gate mounting brackets on it so this is key. Next, I measured the opening that the gate is filling. Now I can prepare for the gate!


Step 2
Now that I am prepped, I have my opening dimensions and could start cutting the material to create the gate. For the horizontal rails, either use 2x4’s or 2x6’s (your choice). Just make sure you are using weather treated lumber for this. For our application we used 2x4’s. You will cut the horizontal rails 1” shorter than the opening. Our opening was 52” wide, so I cut the horizontal rails at 51”.
One tip here is to take a moment to think about your fence pickets you will be supporting off of your gate. You will want to make sure you have plenty of structure to screw your pickets into. Now we can move to the fun part and start to build the gate.

Step 3
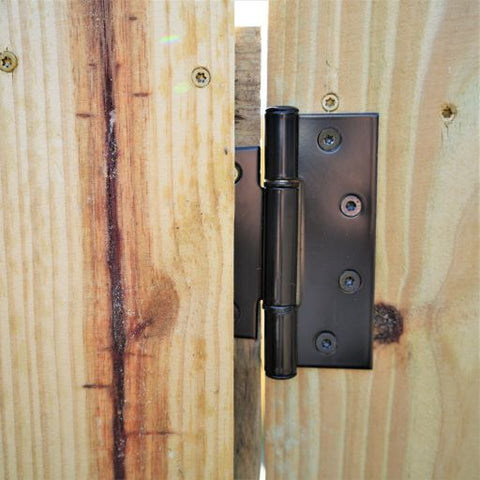
Now I can take our plan and make it happen. You have two different types of brackets, two have the built-in hinge where the other two are standard brackets. I laid out all of my fence pieces and the 4 anti-sag gate kit pieces. This allowed me to keep everything straight and make sure I was installing everything in the right place. Starting with the horizontal rail, line up one bracket with the hinge, mark each hole with a marker, and drill pilot holes where each screw will go.
Using a clamp to hold the bracket, install the screws into the wood. Reference the instructions for placement of the screws and brackets. Keeping the bracket flush with the end is critical. Follow the same steps on the other rail. Please, make sure you are installing the correct bracket on the correct ends.
Now that the horizontal rails are completed, it’s time for the vertical. Adding the vertical rails can be tricky, so make sure you have a nice flat area to do this. A friend really comes in handy here. Lay out the vertical rails where the screws will go, drill pilot holes, then screw into place.
After you have the gate structure made, take time to pull dimensions and make sure everything is square. Samantha and I held the gate in place to make sure everything looked good before going to step 4.
Step 4
The more projects I do, the more I understand that taking the time to prep and read all the instructions first before starting makes for an easier project. Now all your prep and work building the structure of the gate will get tested. One pro tip is having a helpful hand and some clamps to help install the gate hinges to the post. With a buddy, place the gate in the opening using a clamp to hold the gate where it needs to go. I like keeping the pickets off the gate to keep things lighter. Make sure there is a slight crack where the gate will be opening to ensure it will open correctly. Check and make sure that everything looks level and plumb.
Using the provided screws (I must say are high quality and they are star heads too), screw the hinges to the fence post, then screw the hinge into the gate’s 2x4 themselves to lock everything into place. After you have everything buttoned up, try opening and closing the gate. If everything is working smoothly now you can add your pickets in the next step.


Step 5
I am feeling so good, so far, about this gate. It looks good, opening and closing smoothly, and it's a huge upgrade from what we had before. Now the fun part is adding the wood pickets and all the fun hardware. First step is to add your fence pickets. Using your existing fence will help you set them at the right height. Trim them if needed. Our gate used 6’ pickets. You may have to trim the entire length of one, if your gate requires it. One thing I love is the pickets go right over the hinge to give it a clean look.
Tip! I like to have three supports that I can screw into for my pickets, just like a standard fence. I added more 2x4 bracing to the back of the fence to give more points to screw to.
Now you have a working gate, no sag, built correctly to last a long time. I love to take a moment to appreciate the build and do a little happy dance. We can add all the fun accessories to make the gate fun to use!
National Hardware has some amazing accessories to really make your gate yours. Since we love to travel, having the ability to key lock the gate for extra security was top of the list of accessories.
The Smart Key Lock from National Hardware (stock # n190-080) is the perfect solution for added security. It truly has an easy to operate locking system, and you can have one key for all your locks. The Black WeatherGuard rust resistant finish protects your lock from the elements, keeping your gate looking awesome longer. If you're on the inside of your gate, you press the finger pad to unlock your gate, how cool is that!

Adding a pull to the outside is a must. We went with National Hardware’s (stock # n100-055) Arched Gate Pull. This is a heavy duty pull that really goes well with the Smart Key Lock. The Black textured powder coat creates a long-lasting finish. You don’t want to put all this effort in your gate to pull hardware that will lose its finish. Easy to install, in just a matter of seconds you will have it up. It is very comfortable to be able to wrap your hand around and pull your gate open.

Cheers to another project checked off the list. It has been a long time coming to get to this gate and man I wish we did it a long time ago. It actually works the way a gate should. I feel more secure when we leave, and it is so easy to operate. Did I mention it looks good and even the neighbors are asking what I used? National Hardware has all the tools to make your gate build super easy. National Hardware’s Lifespan Warranty gives up the peace of mind that you are using high quality materials. When you want to refurbish your fence or you are planning to build a new one, head on over to National Hardware for everything to make it awesome.

I would love to hear what you think in the comments. So, let’s get out there and create some saw dust in the yard, and as always stay classy.

++A tip I have picked up is waiting at least 3 weeks before applying any outdoor finish to allow everything to dry and acclimate to its new home.++
Marysa on
It is nice to have the tools and parts to do a project like this. The final product looks great!
Whitney Stewart on
Very detailed post and clear with the instructions! Great writing!
Lavanda Michelle on
We need a new fence, this looks easy to install I will share it with my hubby. Thanks
Monica Y on
I need a new fence, this looks easy to install and looks amazing. Will check them out
Star Traci on
This is very impressive. I have never taken on a project of this level and you broke it down into easily manageable pieces.
Beautiful Touches on
That’s a really sturdy looking fence and hinges! Unrelated, but I bet the new wood smelled really nice too!
Renee on
Those hinges are great looking and it looks like that gate will last for a while now.
Rosey on
That hardware really does give it a clean look. It turned out great.
Richelle Milar on
I’m gonna share this with my husband and my dad, thanks for sharing this with us !
Zena's Suitcase on
The project looks great and the tips you have shared as well as super helpful. This will help us plan adding a fence to our yard
Catalina on
I think that building a fence and a gate is so simple with National Hardware! I like when things are simple and accessible!
LisaLisa on
I’ll share this with my husband: we’re looking to build a gate soon.
Kathy on
I really need to check this out. I actually could really use this for a fence.
Amber Myers on
I love how this turned out. I need to get a new gate so this would be perfect.
forever my little moon on
The gate turned out really nice! We need to update our fence gate at some point, but we have a chain link. Wood looks so much nicer though.