
Refresh your console with custom doors
A special thank you to National Hardware for sponsoring this blog. All opinions are my own. #nationalhardware
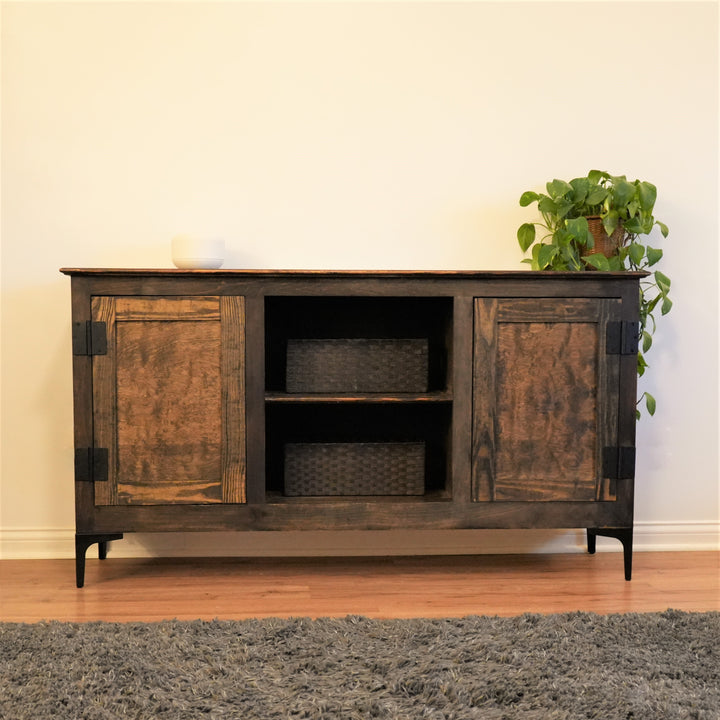
We have had our current console in our living room for the last few years and it has had its fair share of abuse. I felt it was the perfect time to give it a much needed refresh. We opted for some new legs to eliminate the old fashion traditional legs. We found these really nice modern legs online and it was an easy swap. Next was to give us a better way to hide our belongings. We thought this would be a great time to add some custom cabinet doors with the help of National Hardware. This would really give us an opportunity to have a cleaner looking space. So let me show you how easy it is to add doors. Let's gather our materials and let's make some saw dust!
Difficulty: Beginner
Team members needed: 1-2
Time for project: 1-2 days
Tools/Supplies:
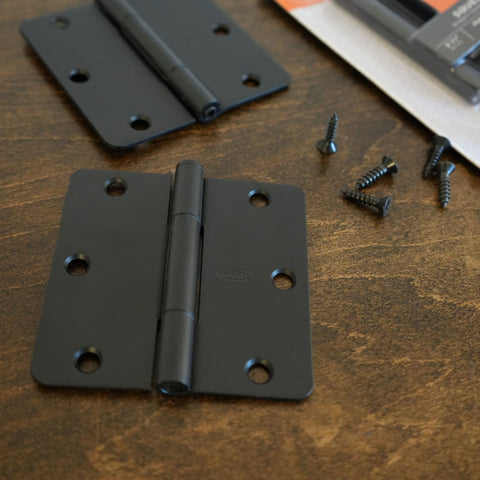
- National Hardware Squeak Guard Hinges (n830-446)
- Saw
- Drill
- Drill bit
- Measuring tape
- Wood clamps
- Pocket plugs
- Pocket screws
- wood glue
- stain or paint of your choosing.
- square
Step One:
One thing I feel I am doing better with each DIY project I complete is taking more time in the beginning. Planning has really helped me speed up my process and create a better product. Go figure planning beforehand makes things easier! The first step was to plan how big the doors needed to be. I measured the two openings, and both were 16” wide by 22” tall. I know the doors need to be a little smaller than the opening so they will fit in there easily. I took the time to make a simple sketch before heading out to cut my materials. With the National Hardware Door Hinges, you get all the hardware necessary for installation. These hinges are built to last, and they will give you years of amazing use. Let's get out there and make some sawdust!
Step Two:
For this build I am using “premium pine board” and a really nice piece of ¼’ birch for the backing. I cut the following pieces using my miter saw. Note to use a sharp blade to eliminate tearout
(4) 1x2.5x10-⅞”
(4) 1x2.5x21-⅞”
(2) 11-3/8 x 17-⅜” +- (cut to fit)


Now that we got the frame pieces cut, we need to cut a ¼” wide x ¼” deep notch for the birch backing to fit into. Using the table saw I created the notch in all the boards, it took three passes to get the right fit. Try to cut the notch in the center of the board thickness. Note you only need to do one side on each board. Once you have verified the backing will fit, take the (4) 10-⅞” pieces and add 2 pocket holes on each end.

Apply glue to the trench of all the pieces and glue to the ends of the 10-⅞” pieces. Go ahead and build the cabinet doors and apply clamps. Then install your pocket screws to make everything snug. Keep in clamps and allow to dry. I went ahead and glued in my pocket plugs as well. Once the doors have dried start sanding with 120 grit and finish with 220 grit.
There are several ways to build cabinet frames, I felt this was a great and easy way if this is your first time!
I finished the door with Minwax Dark Walnut to match the existing finish. This was also a good time to do some slight repair work on the console to make everything look like new.

Step Three
I allowed the doors to dry before installing the hinges. I decided to mount the hinges on the frame first. I measured 2–½” down from the top of the opening and made a mark using my square. This is where the top of the hinge will set. I made sure the hinge was flush on the outside of the console and installed the three screws. Making sure the hinge stays flush with the outside of the console frame. Then I repeated the same steps for the bottom hinge. The 2-½” mark is where the bottom of the hinge will set. (Same steps for the other side as well) I was really surprised how easy this was!


Step Four:
Now it was time to add our storage baskets and decor to really make this look good in our space. The fact that we have two sides to this console that you will not see what is stored really gives it a clean look. With two kiddos anywhere you can have amazing storage is so helpful. Feel free to add cabinet doorknobs to match the style of your home. This really was a simple way to refresh this cabinet and give it a whole new look. Using National Hardware Squeak Guard Hinges will give us a lifetime of amazing use. I love how the exposed hinges really give this console a sweet look.

I want to thank National Hardware for partnering with me on this amazing project. National Hardware can take your vision of your next home project and make it come to life. These high-quality hinges with their amazing finish will add style to any space. With all the hardware being included and clear instructions ensure an easy install.

I would love to know in the comments what you think about this mini refresh on this console? We have so many more fun projects planned, and I am so happy that you took the time to read. This is the final project for 2022, and I am so pumped for 2023. So friends let's get out there and make some sawdust! I am excited to see what kind of amazing pieces you create for your home. As always Stay Classy!
laura on
This is an amazing console with its beautiful doors on it. I really need to do this to mine.
Briana Baker on
Mad skills! That’s gorgeous! I have rehabbed some furniture but it consisted of sanding paper and spray paint lol!
MELANIE E on
It’s great to be able to refresh items in the home to breathe new life into them. I love what you did with the console. it looks great!!!
Renee on
They look really nice and not too difficult to put together.
Richelle Milar on
Wow! Another really great craft to do my husband is gonna love this for sure!
Beautiful Touches on
Those custom doors really are a nice touch, and it seems simple enough!
Catalina on
What a great idea to add doors to my console. It will give a new aspect to it and it will be more practical for me.
Monica on
These doors look so pretty! I’d like to try this with our tv console.
Amber Myers on
I need to do this. I love how the console looks with doors.
Tara Pittman on
I love this. This will save me so much money.