

Outdoor Table with built in Storage
A special thank you to National Hardware for sponsoring this blog. All opinions are my own. #nationalhardware
One of my biggest complaints in our backyard is the lack of storage. A place for the kiddo's small toys or gear for the grill would be welcomed! We wanted to add a piece of furniture to our back patio, and we decided storage was one of the main priorities. I’d bet we could all use more storage in our yards, right! This build is a great way to add easy storage while adding a statement piece to your backyard patio or deck. Let's gather our materials and let's make some saw dust friends!
Difficulty: Intermediate
1-2 People required
1-2 Day Time Frame
Tools/Supplies:
- National Hardware Removable Pin Broad Hinges (STOCK # N208-827)
- Saw
- Drill
- Drill bit (⅛ inch)
- Measuring tape
- Wood clamps
- 1-½ wood screws
- 2” wood screws
- 3” wood screws
- Pocket screws
- Exterior wood glue
- Exterior stain or paint of your choosing.
- Sawhorse
Step One:
Before starting any project take the time to design the overall size and look of the piece you are wanting for your space. If you have CAD software available to you, plan all cuts to make the build process as easy as possible. With the National Hardware Removable Pin Broad Hinges, you get all the hardware necessary for installation. The galvanized finish will insure it will last for years to come! Now let's gather all the material and let’s start building the frame for our outdoor table. Remember you can always customize the size and look of this build to match your taste.
Step Two:
First thing we are going to build is the main storage box. This will set up the entire build. For this entire build we are using outdoor lumber! Using 1x6’s cut the following:
(4) 58”
(4) 21.5”

When picking your boards make sure you pick the best possible boards, this will make your life much easier during this build process. Using your pocket hole jig, add three pocket holes min on each end of the 21.5” pieces. Now take one of the 21.5” boards and use exterior glue and pocket screws to attach on each end of the 58” board. Take another 58” board to cap the other side. Level one is now complete! A tip to make level two easy is add a min of 5 pocket holes on one long side of each of the remaining 58” and a min of two on the long side of the 21.5” boards. Using your wood glue, spread a layer around the entire perimeter of layer 1. Now repeat what you did with level 1 to attach the final boards. The additional pocket screws will make this so much easier.


Step Three
With the body of the storage table complete now we can add the supporting structure. First, I cut the following for the base:
(4) 2x4x23.25” (vertical legs)
(4) 2x4x23” (horizontal bracing on each end)
(2) 2x4x47” (long struts under the bed of the table)
(2) 2x4x19” (bracing under the bed of the table)
After cutting all the pieces I went ahead and did a little sanding on each one. It is way easier to sand them as individual pieces than trying to sand the entire build as one piece. I am learning that the little time taken to clean each cut piece, will save a ton of time at the end. With the storage box on sturdy sawhorses, it is time to install the four-leg post. Using the 23.25” pieces, I measured their location and marked them with a pencil. Using my square and a clamp to keep everything true, I attached each post to the storage box using wood glue and 2” wood screws. Now let's sturdy this table up some. Using 3” wood screws I installed the two 23” horizontal braces on each end. Now the vision of the table is starting to come to life. Taking the long struts (47”) let's add three pocket holes to each end, using pocket screws and wood glue attached on each side. Finally, let's add the two middle supports (19”) with pockets screws and wood glue. Equally space them for the best support for the belly of the storage container. Now you have a complete base, as always you can adjust the size and materials to fit your design.


Step Four:
Now it is time to add the floor. I wish I would have sanded each floor piece before installing in the base. It made it a little more tricky to sand around the edges after I had it installed. Using the help of a friend, let's rotate the table right side up. Using 1x6’s again cut 4 pieces at 56.5”. Using 1-½” wood screws, attach the floor to the base, keeping a small gap to allow water to drain. After installing the floor, I went back and sanded them smooth.
Step Five:
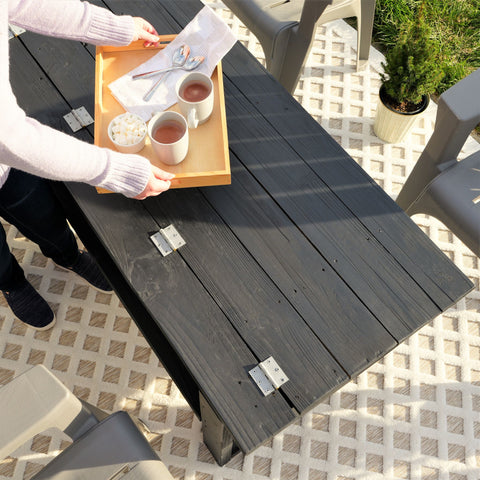
The base is completely done. Now we move on to the top! Again it is extremely important to pick the best boards you can for this. A little extra time at the home improvement store can save some headaches later. Cut all your 1x6’s to 60”. You will need 5 pieces. Starting on one side attach one of the 60” boards using 1-½” wood screws. This will also be the board that the hinges attach to, it will not fold! Now let's build the lid. Line up the other 4 boards, using scrap pieces of the 2x4 material to attach all the boards together. Please note to keep a small gap to allow water to drain through. You may have to trim the width of one of the boards down to achieve your desired width. Now it is time to lay out where the hinges need to go. Since I knew, this lid was going to carry some weight I decided to go with four hinges. Like all National Hardware items, it came with all the high-quality hardware to make this go super easy. After all the hinges were installed, I tested the lid for function.


Step Six:
I personally love the end of the build. Final sanding and adding color to see your vision come to life is awesome to me. I love the charcoal gray finish, it really gave it a modern feel. Note before I sanded I took the time to take off the hinges.


Step Seven:
After the stain has dried, reinstall the lids using the same hardware. With the help of a friend, place the outdoor table in your desired place. Now get hot chocolate and smores ready and enjoy your new piece of outdoor furniture. I love all the storage it provides and the modern look it gives our space. National Hardware really makes it so easy to take an idea and make it come to life. I know these hinges are built to last and we will enjoy the build for so many years to come.
So friends, I would love to know in the comments what you think of this build? Could your backyard benefit with more storage?
I want to thank National Hardware for sponsoring this Blog post and I hope you guys enjoyed the build. As always stay classy!
Renee on
This is so cute and doesn’t look too difficult to make.
Beautiful Touches on
Storage tables are the bee’s knees, yours turned out really lovely!
laura on
It looks fantastic, all the storage that you are gaining.
Catalina on
I love the model of this table and the color. Maybe it’s the right solution for our backyard too!
Telina on
That outdoor table looks amazing! The built-in storage would be so useful!
Richelle Milar on
Wow! This is absolutely awesome! My husband would love this for sure another work for him lol
forever my little moon on
It turned out quite beautifully! I love that it doubles as a storage space!
Tara Pittman on
I love that this table has storage. I could store the chair cushions there.
Amber Myers on
Wow, I need one of these. I love how yours turned out.