

Hanging wall art with National Hardware Leveling Hangers
A special thank you to National Hardware for sponsoring this blog post! All opinions are my own! #Nationalhardwarepartner

We have been in the process of adding some decor around the house lately. One corner of our Living room seemed a little bare and I wanted to add some texture and color into the space. I was excited when I found this beautiful piece at Target and knew if we could hang it vertical, it would make the perfect addition.

I was needing to add some new hangers to it so it would hang the way I need. National Hardware Leveling Hangers are my favorite type of hanger to go to for projects like this. They take the worry out of hanging your frames or art perfectly. With the steel sawtooth design, they are super durable and quickly fix crooked pictures when hanging!
Check out the steps below I took to hang our art and hopefully you can give National Hardware Leveling Hangers a try too!
Let me know in the comments below any questions! I would love to hear where you would love to add some art in your home or office?
Estimated Time for project:
20-30 Min
Tools/Supplies:
- National Hardware Leveling Hangers (Item: N260-174)
- Hammer
- Pencil
- Drill
- Drill bit (if necessary)
- Level
- Wall Anchors rated for the weight of your art
- Measuring tape
- Art or framed piece

Step One:
Deciding what to hang
To start, measure your wall space you would like to hang your art centered on or precisely the space you would like to fill in. This will give you a guide of how big of a piece you need to fill the spot. Now it’s time to figure out what piece of art or photo you would like to install. In our case, we needed a rather large rectangle style to really fill in the tall and narrow spot between the wall and window. We opted for a minimal art piece to give the space a modern touch and some texture to the bare corner of the room.

Step Two:
Attach the Leveling Hangers-
Once you have decided on the art you are going to hang, it is time to attach the leveling hangers! Gather your tools needed and get started!

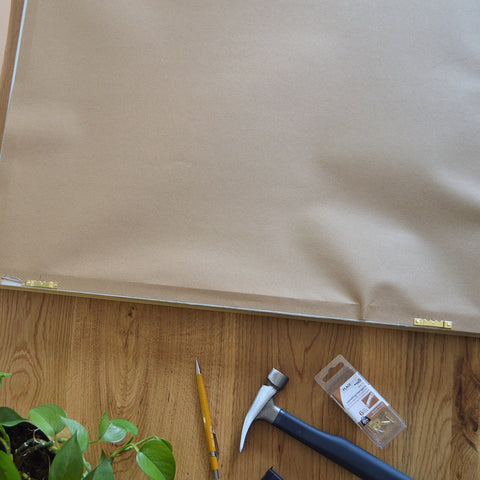
Using your measuring tape, measure the entire length of the edge of your art that the hangers will be attached to. If you are going to install one hanger, find the center of your frame to install your hanger there. 
If you are using two hangers like I did, measure off each end the same amount and make a mark. This is where your hangers will need to be installed. I tried to keep the distance between my two hangers simple so I can transfer this dimension to my wall later. Your National Hardware Leveling Hangers box will include the nails needed to install the hangers. I love this! No worry of needing to find the right nails for the hangers. Using light taps with your hammer, install the hangers where you made your marks.

I love using the National Hardware Leveling Hangers for hanging art and photos around our home. Whether we are hanging a family photo in our living room or some fun art in our office space, they make it super easy. National Hardware Leveling Hangers are made of steel for durability and the sawtooth designs makes it a breeze for fixing crooked pictures. This has definitely come in handy at times and takes the worry out of being totally perfect with the wall mounting.
That’s it for this step! Now onto the wall installation!
Step Three:
Prepping your wall
Now that your hangers are attached, you are ready to prep your wall for hanging! To start, I would hold the art on the wall making a small mark showing how high I want it to be. This will also help you place it correctly to fit in your space. 
Using a tape measure and a level, mark the two spots where wall anchors need to go for the hangers. Make sure you use the same dimension that you used for installing the hangers. Follow the instructions on how to install your wall anchors that you chose. Make sure they are rated to hold the weight of the art you are hanging. Remember that your National Hardware Leveling Hangers each have a hold weight of up to 20lbs (9.1kg).


Step Four:
Hanging & enjoying your piece
The final step is hanging your art on the wall anchors you mounted. Once you slide the National Hardware Leveling Hangers onto the screws, take a step back to review how your piece looks in the space. You are now done and can put any finishing touches to the space you like. It's amazing how simply adding some new art to your room or space can make it feel like new, inspiring or even bigger! Enjoy your new art!

Be sure to check out the Leveling Hanger size options available now for your project with National Hardware!

Marysa on
This sounds like it would make hanging pictures much easier. I will have to look into this for mounting art.
Catalina on
I was looking for new decoration item for my house and this is exactly what I need!
IceCreamnStickyFingers on
I love using these auto leveling hangers. But you still have to line them up using a level if you have two leveling hangers on your photo. I need to go buy some new home decor to hang up.
Rosey on
It does make the corner look better. I need to get some art up in our house.
MELANIE E on
I need to look at getting some wall art to mount ion my living room. The wall is looking a bit sparse.
Renee on
I use this type of hanger all the time. It makes it so easy to make sure it hangs straight.
Terri Steffes on
I need this in my life. I’m an “eyeball it” sort of person. You can imagine how many holes I have in my walls.
Amber Myers on
I need this! I have lots of art I want to put up so I need these hangers.
Richelle Milar on
I really love how minimalist and elegant looking your living room is. Surely Ntional Hardware is amazing