

Simple DIY Keepsake box perfect for gifting!


Step 1:
Determine the size of the box you want to create. I wanted my box to be 8” x 6”. Now gather your material according to your project! I decided on Walnut (feel free to use Pine or any other type).

Step 2:
Determine how you want to build your box. I decided to make my box using 45 degree miters. Feel free to use butt joints or any other type of box joinery you like. Setting the saw blade to 45 degrees I started my cuts. Moving my saw fence to the proper dimensions to get the 4 pieces of my box made. Always be mindful of the blade when cutting!
Tip! You can also use a miter saw or even a hand saw with the proper jig.

Step 3:
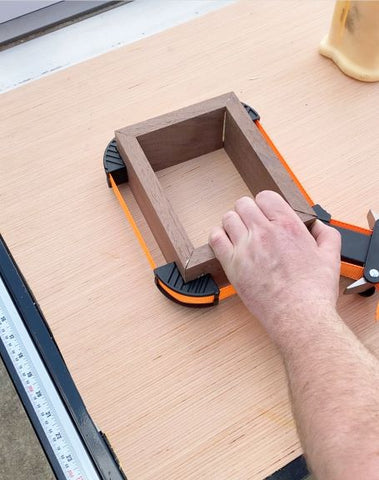
Time for the glue! Using your favorite wood glue, apply to all miter faces, using a box clamp, align and tighten. Allow to cure per your wood glue instructions. You can never go wrong with waiting 24 hours.
Tip! If you are using Pine and do not have clamps, feel free to use pin nails to keep it together.
Step 4:
I wanted to keep the design simple, so I glued a bottom making it ½” bigger than the box. Using the table saw I cut my bottom to size then glued to the bottom of my box. The lid will be the same size as the box. This is where I added a little flair to my box. I decided to CNC Samantha’s favorite flower on top. You can CNC, carve, or paint any design you like if you want to add that special touch.

Step 5:
Now it is time to add some hardware to our box. I went with National Hardware #N211-359 Brass Hinges and #N22-466 Decorative Hasp. Using your Tape Measure mark where the hinge needs to go. If you are using Soft Woods a screwdriver will work perfectly. Since I am using Walnut, I set my drill to a low speed to install the screws. Take your time to keep everything lining up perfectly.


Next you will need to find the center of your lid. Using that center lineup the body of the hasp and install the nails on the lid. Using your hammer make light steady taps so you do not bend the nails. Now the lid is complete, add the hasp onto the box for the opening in the body to slide over. Again using light steady taps to install the nails and you are done.


Step 6:
I chose to add finish once I was completed but you can do this before. Especially if you are staining or painting your box. You are finished my friends, now stand back and enjoy the work you did.


I hope you have a fun time creating this amazing Keepsake box. What better gift to give that special someone than a handcrafted one with the help of National Hardware. I would love to know your thoughts on my keepsake box. How would you customize it to make it your own! You can go wild with different woods, finishes, and really customize it with CNC work or carving. This is a fun DIY project that you can do! Stay Classy!
Rosey on
I love that you made the box yourself. This is the perfect way to make your keepsake box a keepsake box in itself.
Sol on
This is so interesting! My hubby explored his DIY skills during the pandemic and surprised us with a nice kitchen island cabinet, wardrobe cabinet and office tables. Will surely share this to him.
Kathy Myers on
How cute! Since my husband has retired I have him honey do’s. I will have to add this to his list!
Gervin Khan on
Wow! This DIY box looks so cool. The minimalist desing makes it so mesmeirzing. Loved it!
Fatima T on
This is a great gift idea for a friend or family member during the holidays.
IceCreamnStickyFingers on
This is a cute box. I should make one to give to my son.
Beautiful Touches on
That keepsake box turned out beautifully, and I never would’ve guessed how attainable doing it myself could’ve been!
Richelle Milar on
Wow! This looks like a really great box! I love it! I’m gonna let my husband see this
Tara Pittman on
This might be a perfect project for my husbands Trail Life group. They need a new project.
Amber Myers on
This is such a cute gift idea. I am loving this box. I know I’d be happy to get one.